In the busy world of run specialty retail, it’s easy for the accessory category to get lost in the shuffle. Let’s face it, footwear is the product that creates all the excitement and gets the big attention from both retailers and consumers alike. This makes it no big surprise that finding time for curating and merchandising your accessory assortment (and a few other essentials) often falls lower on the “on to-do” list behind the myriad of other things that happen every day and night to keep your store running smoothly.
Although they tend to be less glamorous than cutting-edge footwear or beautiful new apparel collections, accessories are the sleeper of the run specialty world. They quietly keep runners and walkers more comfortable, hydrated and safe while the heavy hitter categories take the spotlight. From performance-enhancing gear to fashionable accents, the variety of accessories available can significantly impact a runner’s experience, so it’s worth your time to step back, take a few minutes and put a little extra effort in to displaying them well for your customers.
This article will dive into a few of these essential accessory categories that can be tricky to merchandise, but that can really shine when displayed effectively and can add significant sales dollars to your transactions. Over the decades of merchandising running stores and hanging every kind of accessory you can imagine, we’ve picked up some great tricks along the way. These tips will be helpful for run specialty retailers as you reset your store with new product arriving or if you’re just looking for fresh ideas to breathe new life in to your existing displays.
GPS Products/Tech
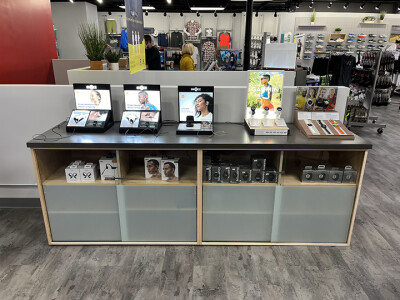
Everybody knows how tough it can be to sell these products without customers touching and feeling them. So why not set up your electronics department to be more hands on? Whether it’s all GPS watch-focused and you include security watch cables at a bar or kiosk area, or it’s massage guns that are displayed in cradles with charging capabilities hidden out of view, the ability for your customer to touch and use these products will greatly increase the likelihood of them making a purchase.
For the tech or electronics category, we often design a custom cabinet display with hidden storage below for backstock inventory. Then we drill some holes on the top of the counter and run the charging cords down to the hidden power access. This presentation keeps things clean and streamlined, while creating an irresistible opportunity for your customers to give the products a try. The size of the cabinet or bar counter can be determined entirely by what the size your store will allow, but even a small hands-on display will be more enticing than keeping it all in the box.
Kent Wories, owner of several Colorado based Runners Roost locations, notes that they have seen a definite uptick in customer interest and sales in this category since creating their tech bar in their recently remodeled Denver location.
If space or budget doesn’t allow for a custom hands-on display such as this, the next best thing for displaying tech goods is in a vertical glass display case, ideally one with some lights on top and a storage area in the bottom.
These cases can be found very easily from IKEA for around $100-$200 and they make the product easy to shop, as much of it is shown at eye level. I suggest avoiding horizontal glass display cases, as they tend to be where dust collects and products go to die.
These types of cases tend to be larger than what you actually need, so employees feel an urge to fill the extra space with anything they can, including old boxes, more inventory or anything else not nailed down. That makes for a clumsy, disorganized presentation.
Recovery/WellneSs
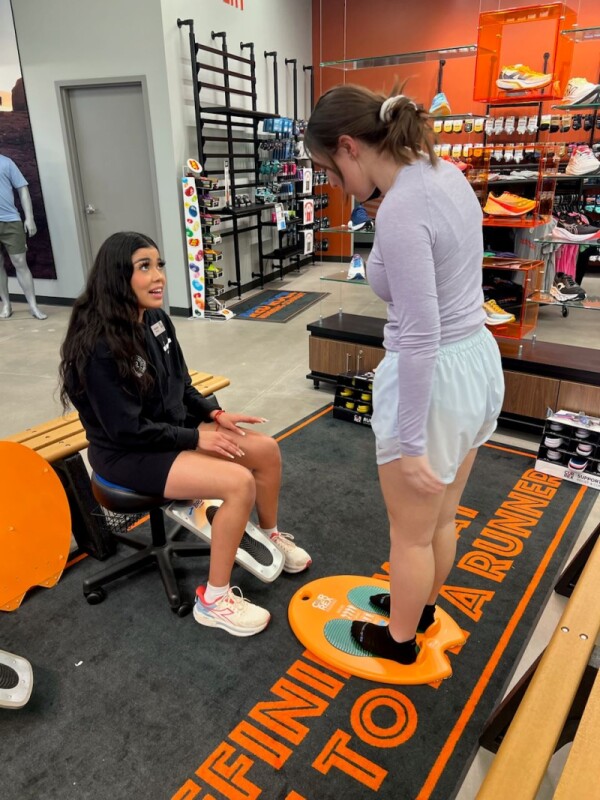
If you have a large enough recovery selection to warrant demos, then I’d share the same advice as with the electronics — get your customers touching and using the products to create excitement around making the purchase. Plus, if somebody’s hurting and can find some relief while shopping in your store, that’s a win all around. There’s no better way to improve your customer’s experience in your store then to allow them to loosen up some tight muscles on the spot.
Massage guns can go either way on the merchandising — either as part of your tech bar or carried over to the recovery zone, depending on your overall product assortment and the amount of merchandising space you’ve got. If they will be living in the recovery zone, I suggest displaying them either on a vendor cradle or on a shelf or bin near a comfy chair so your customer can relax for a few minutes and really enjoy using the gun on some tight spots.
I also recommend including a nice graphic in this space, inviting your customer to sit and try out some of the products. Also, including a mat on the floor or rolled up next to the chair is very helpful for trying rollers and other hand-held massage tools. Be sure to hang all products on a wall system or organized floor fixture in the same area so bringing something home after trying it out is too tempting to resist.
Hand-helds/Hydration Packs and Running Vests
These little buggers can be trickier than expected when you take them out of the box and start merchandising. You’re dealing with several issues here:
• Some of this product is inherently “floppy” (yes that’s the technical term), while other items are more firm and less flexible (ie: a running hydration vest versus a hand-held bottle).
• There’s a large variance in size within this category and you’re faced with the daunting task of curating the entire collection to work together aesthetically.
• Your third challenge is to communicate the product use to the customer and make it simply irresistible to head home without it.
So where do you start? I would bring in somebody to help here — and by somebody I mean a torso or full body mannequin that you can display on a nesting table in the area or place on a shelf integrated comfortably on the wall. Finally, if budget and space allow, display an additional full body mannequin in the zone and allow it to tell your product story.
Retailers often forget that mannequins of all shapes and sizes can do much more than just sell apparel. They can be your ace in the hole for accessories as well. And I don’t mean just drop on a hat or some socks on their feet, I’m talking about fully loading your mannequin friend with every appropriate accessory from head to toe.
This is a great way to illustrate just exactly how these somewhat clumsy hanger displaying vests will look on a human form. Have your mannequin clutching a hand-held bottle, donning a waist pack or, if you don’t carry vests, drop on a hydration pack instead.
Seeing these products on display like this does something very special — it brings them to life. These specialized products immediately go from something “floppy” to an exciting piece that your customer now thinks they can’t exercise without. It’s exciting to see these things in use.
As with all inspiring displays, be sure to display all of the product shown on the form right next to it in bins, on shelves or hung on hooks. When merchandising these types of products on a wall, it’s very important to keep things what I like to call “visually balanced.” This is different than absolutely symmetrical, where everything on the left side of your display matches the opposing side exactly.
Having a visually balanced wall means that when you look at it, it feels “comfortable” to the shopper. It’s not too crowded, not too empty and doesn’t feel lopsided or “out of whack.” The best way to accomplish this is by placing all of the larger items on the bottom of your display and work your way up towards the top with the smaller pieces.
If space allows and you’ve got enough inventory to keep things full, then you can really knock it out of the park by placing larger items in this category (hydration packs and hydration vests) on the wall with a torso form on a shelf and then carrying the category over to a floor fixture that houses all of the smaller items (waist belts, hand-helds and water bottles).
If you’re tighter on space and stock, then go for a tight, clean wall presentation with packs and vests on bottom for balance and then continue to display medium to smaller items as you get to the top.
Whenever possible, I suggest including category signage as well. Just because you know where everything is in your store (and what it’s all used for), your customers often do not. Remember, new runners or walkers may have absolutely no idea that a hand-held water bottle even exists, let alone where to find it in your store and how to use it.
Calling out technical features in your signs or suggesting staff picks similar to in a wine or bookstore is so helpful to shoppers, especially since they’ve come to trust your knowledgeable staff. Applying these simple tips when displaying the hydration category can create add-on sales and product users from even the most novice of consumers entering your store.
Small Accessories
Every well-stocked running store ends up with a rather large mix of what I’ll call assorted, yet important, small accessories. These items may range from Body Glide-type products to detergents, to visibility and safety and beyond. There are a few important rules of thumb for merchandising these types of products.
First, never, under any circumstances, display non-edible items near anything that can be consumed. For some reason, there’s a tendency to lump all physically smaller items together, whether or not the categories align. There is absolutely no product adjacency between something you use for sun protection and an energy gel, yet I often see all of these items merchandised together as a quick “Grab-n-go” impulse item up front.
You’ve got the right idea about tapping in to the impulse purchase concept, but if all of these items will be up near the cash wrap, be sure to clearly separate their merchandising.
Second, you’ll notice that I said “next” to the cash wrap for displaying these items, and not “on” the cash wrap. That’s an important distinction to make. Placing all kinds of random accessories on the cash wrap never goes well. This results in a messy, cluttered presentation and a poor final impression for your customer as they pay and complete their transaction.
Your cash wrap should be a clean work space with a computer, a shop logo clearly placed somewhere (typically the back wall works great for this) and possibly some business cards or a small gift card display. All other add-on sales should be cleanly organized on a floor or wall fixture right next to the cash wrap for last minute grabs as shoppers head up to pay.
Finally, I’ll repeat my earlier point about hydration items to conclude my rules of thumb for merchandising these small accessories — and that’s to get them off the wall if at all possible. It’s so easy for small accessories to get lost in the shuffle of a large display wall and that results in frustrated customers and missed sales.
If you can pull these items off the walls and create effective “category pods” on small two-way fixtures (or something similar) with clean category signage on top, you’ll see much better sell through.
People’s brains like things organized, whether they know it or not, and going to one fixture for everything they need in one spot is a very pleasing shopping experience. Searching through a big wall of items is frustrating and makes your customers wonder why they didn’t just grab these few things online instead of driving down to your store to shop locally.
Sports Bras
The last challenging category to merchandise that we’re going to cover here is sports bras. Despite them not being accessories per se, they’re absolutely considered an essential, so I’ll share a few pointers that will be sure to improve your merchandising of this category.
Let’s face it, many sports bras simply don’t have great hanger appeal. They can be floppy (there’s that word again), and can be clumsy with the straps that often get tangled on display. This is when you reach back out to your good mannequin friends from earlier in the article and put them to use.
I would argue that the sports bra category, almost more than any other, benefits most from being displayed on forms. I suggest investing in some bust forms and integrating as many in to your sports bra section as will reasonably fit. It works best to dress your bust form with a bra on a shelf and then to place all of the color options available in this style directly below the form or right next to it.
Including graphics or signage to call out features or style names is always helpful. Placing your sports bra section close to the fitting rooms is optimal. If this isn’t possible, then at least double merchandise an offering of core basics right near the fitting rooms as a not so subtle reminder to all women walking in to try things on.
With this category especially, I would suggest honing in on your best sellers and working hard to keep them well stocked and well merchandised. Having a couple styles for low, moderate and heavy support makes for a great presentation, especially with alternate color options that are well organized and cleanly displayed on modern torso forms.
The Final Touch
No matter which essential product category you’re merchandising in your store, remembering to feature it throughout the store multiple times is always beneficial. People are short on time and energy, so products are often missed unless they’re shown multiple times to your shoppers.
If you’ve got a display in the front entry that includes some nesting tables and a mannequin, be sure to dress that mannequin as completely as possible with not only your latest and greatest apparel and footwear, but also all of the applicable accessories. Then, feature some of these same pieces on the nesting table right by the mannequin.
As customers wander over to the shoe wall, sprinkle in some more displays on shelves with torso forms that continue to highlight some of the key accessories. Finally, over in the department where they’re being stocked, don’t miss yet another opportunity to display the products on forms or in an interactive display.
Remember, every single aspect of the experience you provide your customers from the moment they open your front door until they pay and walk out, leaves an impression that is very difficult to change. So if it’s positive, that’s great news. But if it’s less desirable, you’ve dug yourself a hole that’s very difficult to get out of in the eyes of your customer. Effortless shopping and visually appealing displays are the foundation of a great retail experience.
Merchandising accessories in running stores takes a little practice, but if you try your hand at some of these simple suggestions, you’ll start to see add-on sales happening with very little effort. With the proper visual merchandising of these products, your customers will start to learn about all of the amazing extras that actually add comfort and safety to their active endeavors. Soon they’ll be asking themselves how they ever lived without them.
Online training …
Holly Wiese is owner of 3 Dots Design, a well-known retail and merchandising consulting firm that specializes in the specialty run and bike channels. The firm recently launched a series of online training courses for visual merchandising and retail design. 3 Dots Design has worked with the top specialty retailers in the nation for decades and is sharing their expertise in these easy to use, self-paced courses.
The course offering will continue to grow, but the initial selection includes one devoted to footwear presentations, merchandising difficult product categories, what to expect if considering a store remodel and general best practices for visual merchandising and store design (their most popular). Other training courses being developed include topics such as merchandising apparel and merchandising to women.
Most courses are 30-60 minutes. The pricing ranges from $99-$139 and the information is yours to view as many times as you’d like once you purchase. These are a great aid for training new staff or teaching long-time employees new tricks about making your store look great.
For all of the details: www.3dotsdesign.com/online-training
.